AI Media Documentation
Overview
AI Media is an AI-powered ad creation wizard designed to help marketers generate marketing banners and popups quickly and efficiently. It provides a simple and intuitive interface where you can configure campaigns, define creative directions, and generate high-quality visual assets using AI.
Accessing AI Media (Tango AI)

To use AI Media:
- Log in to your Tango.ad account.
- From the dashboard, navigate to Campaigns and got to Editor.
- You will be taken to the AI Media(Tango AI) Block , where you can start configuring your campaign.
If you do not yet have an account, you can sign up for a new Tango.ad account.
AI Media (Tango AI) Interface Overview
The AI Media interface is divided into two main sections:
- Left Panel (Settings & Configuration): Used to define your creative idea, layout, style references, and generation options.

- Right Panel (Campaign Assets): Displays the generated banners and popups for review, download, and further customization.

AI Media Settings
1. Creative Idea

Use this field to describe the overall theme or concept of your banner or popup.
Examples:
- "Minimalist summer vibes"
- "Cyberpunk neon sale"
You can also select from predefined theme tags such as:
- Black Friday
- Christmas
- Summer Sale
- Luxury
- Cyberpunk
- Eco-Friendly
- Flash Sale
These tags help guide the AI in producing visuals that match your campaign style.
2. Orientation & Layout

Orientation

Choose the device type your banner is optimized for:
- Desktop
- Mobile
Layout

Select how the content is positioned within the banner. For example:
- Center Left
This controls the placement of text and images inside the generated assets.
3. Style Reference(s)

Style references help the AI understand the visual direction you want.
You can:
- Drag & drop images into the upload area
- Click to upload from your device
- Select images from your library
These references influence colors, typography, mood, and overall design.
4. Product Assets (Optional)

Upload product images that you want to appear in your banners.
Supported formats:
- PNG
- JPEG
For best results, use high-quality images with clear backgrounds.
5. Headline and Text (Optional)

Add a custom headline for your campaign.
Example:
- "50% Off Everything"
You can apply the same headline to all generated assets by enabling the SAME FOR ALL toggle.
Suggested quick prompts:
- 50% Off Everything
- Limited Time Offer
- New Season Collection
- Free Shipping Today
- Shop the Look
You can also add multiple language variants for multilingual campaigns.
Tokens & AI Models

This section shows your available token balance.
Example:
- 105 tokens
Tokens are consumed every time you generate a new asset.
AI Models
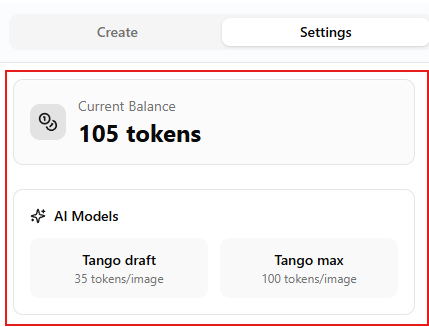
Choose which AI model you want to use:
AI Media Draft
- Cost: 35 tokens per image
- Best for: Quick drafts, brainstorming, and early concepts
AI Media Max
- Cost: 100 tokens per image
- Best for: High-quality visuals and final campaign creatives
Purchasing Tokens

If your balance runs low, you can purchase more tokens.
Available packages:
1,000 Tokens – 10€
- ~29 images with Draft
- ~10 images with Max
3,500 Tokens – 28€
- ~100 images with Draft
- ~35 images with Max
10,000 Tokens – 70€
- ~286 images with Draft
- ~100 images with Max
Click Purchase with Stripe to securely complete your payment.
All payments are processed securely via Stripe.
Generation Engine

Use the Generation Engine dropdown to select which AI model will be used:
- AI Media Draft (35 tokens)
- AI Media Max (100 tokens)
Cost & Token Usage

Before generating an asset, you can preview:
- Number of images
- Token cost
- Remaining balance
Example:
- Images: 1
- Cost: 35 tokens
- Balance: 105 tokens
Generating Assets

Once all settings are configured:
- Click Generate 1 Asset.
- AI Media will create a banner or popup based on your inputs.
- The generated content will appear in the Campaign Assets panel.
- You can review, refine, or download your assets.
Use the Download All button to export everything at once or filter by device type.
Campaign Assets Panel

This panel displays all generated creatives.
From here, you can:
- Review generated designs
- Adapt or regenerate assets
- Download creatives for use in your campaigns
If no assets are generated yet, you will see a message prompting you to configure your campaign.
Actions Settings
The Actions dropdown lets you define what should happen when a user interacts with a generated asset (e.g., clicks a banner or popup).

- Do Nothing: No action will be triggered when the user interacts with the asset.
- Go to URL: Redirects the user to a specified URL when they click the asset.
- Go to URL and Show This Step Sticker: Redirects the user to a URL and automatically displays the current step sticker.
- End This Campaign: Stops the campaign when the user interacts with the asset.
- Show This Step's Sticker: Displays the current step’s sticker without redirecting the user.
- Reopen This Step from Sticker: Reopens the current step when the user clicks the sticker.
- Change Step: Moves the user to a different step in the campaign flow.
Best Practices
- Be specific in your creative idea for better AI results.
- Upload style references to ensure consistent branding.
- Use high-quality product images.
- Start with Draft for testing and switch to Max for final visuals.
- Experiment with different layouts and orientations.
Next Steps
After generating your assets, you can:
- Add them to your Tango.ad campaigns
- Customize them further
- Track their performance using Tango.ad Analytics
Continue Learning:
Discover how to evaluate customer interactions and campaign performance in the next article — Tango.ad Analytics Overview.